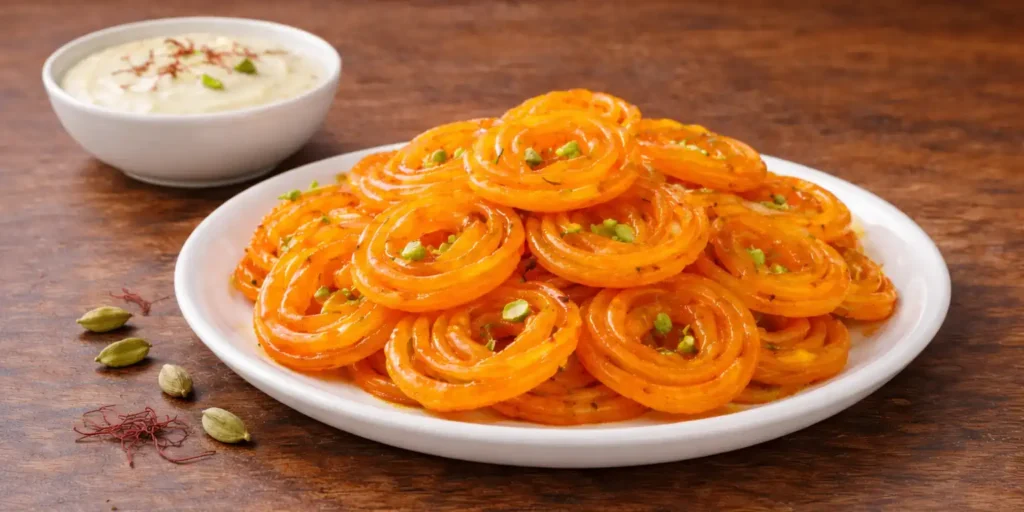
Jalebi Recipe: Crispy, Juicy, and Just Like Market Style
Hello friends! Who doesn’t love hot, crispy, and juicy jalebis? That bright orange swirl, the crispy outside, and the sweet syrup that bursts in your mouth – it’s pure happiness. Whether it’s a festival, a wedding, or just a Sunday morning, jalebis make everything special .
The smell of jalebis frying in ghee is so amazing. It fills the whole house and makes everyone come to the kitchen. When you bite into a hot jalebi dipped in saffron syrup, it’s just perfect. This jalebi recipe will give you that exact market taste at home .
Many people think making jalebi at home is very difficult. But with the right method and a little practice, you can make perfect jalebis in your own kitchen. The key is the fermented batter and the right sugar syrup consistency . Let me show you how to make this delicious jalebi recipe step by step.
Ingredients for Perfect Jalebi
This recipe makes about 15-20 jalebis.
For the Batter:
- 1 cup All-Purpose Flour (Maida)
- 2 tablespoons Cornflour or Rice Flour
- ½ teaspoon Baking Powder
- ½ cup Curd (Yogurt) – fresh and slightly sour
- ½ cup Water (approx, for batter)
- A pinch of Orange Food Color or Turmeric (optional)
- A few strands Saffron (Kesar) soaked in 1 tablespoon warm milk (optional)
For Sugar Syrup (Chashni):
- 1 cup Sugar
- ½ cup Water
- ½ teaspoon Cardamom Powder (Elaichi)
- 1 teaspoon Lemon Juice
- 1 teaspoon Rose Water or Kewra Water (optional)
For Frying:
-
Ghee or Oil for deep frying (ghee gives better taste)
For Garnish:
- Chopped Pistachios (Pista)
- Saffron strands (kesar)

Step-by-Step Recipe Method
1st Step:
In a large mixing bowl, take the curd. Whisk it well until smooth. Add all-purpose flour, cornflour, and baking powder to the bowl .
2nd Step:
Add water little by little and start mixing. Use a whisk to make a smooth batter without any lumps. The batter should be thick but flowing, like pancake batter .
Tip: The batter should not be too thin or too thick. If too thin, jalebis will become flat and not hold shape .
3rd Step:
Add food color (if using) and soaked saffron to the batter. Mix well. Cover the bowl with a lid or cloth and keep it in a warm place for 8-10 hours or overnight to ferment .
Tip: Fermentation is very important. It gives jalebis that slight sour taste and makes them crispy .
4th Step:
After fermentation, the batter will have small bubbles and will smell slightly sour. Whisk it well again. If batter looks too thick, add 1-2 tablespoons water to adjust consistency.
5th Step:
Now prepare the sugar syrup. In a deep pan, take sugar and water. Heat on medium flame and stir until sugar dissolves completely .
6th Step:
Let the syrup boil. Add lemon juice. This prevents sugar from crystallizing . Cook until syrup reaches one-string consistency. To check, take a drop of syrup between your thumb and finger – it should form one string when you pull apart .
7th Step:
Add cardamom powder and rose water to the syrup. Mix well. Keep the syrup warm on very low flame while you fry jalebis .
8th Step:
Heat ghee or oil in a flat, wide kadhai on medium flame. The oil should be medium hot, about 340°F . To check, drop a tiny drop of batter – it should come up slowly and sizzle.
9th Step:
Pour the fermented batter into a squeeze bottle, piping bag, or even a strong plastic zip bag with a very small hole cut at one corner . The hole should be about 2-3 mm wide.
10th Step:
When oil is ready, squeeze the batter directly into hot oil in circular motions. Start from the inside and go outside to make spiral shapes, about 3-4 inches wide .
Tip: End each jalebi with a quick stroke back toward the center so it doesn’t open up .
11th Step:
Make 3-4 jalebis at a time. Do not overcrowd the pan. Fry on medium-low heat until they are golden brown and crispy. This takes about 45 seconds to 1 minute on each side .
12th Step:
Remove with a slotted spoon, let extra oil drain for a second. Immediately dip the hot jalebis into the warm sugar syrup .
13th Step:
Let them soak in syrup for 30-45 seconds only. If you keep too long, they become soggy . Remove with a fork or tongs.
14th Step:
Place on a wire rack or plate. Garnish with chopped pistachios while still wet from syrup. Serve hot or warm.
Pro Cooking Tips for Perfect Jalebi
-
Fermentation is Must: Do not skip fermentation. The batter needs 8-10 hours to ferment. This gives jalebis their signature taste and crispy texture .
-
Use Sour Curd: Slightly old, sour curd works better than fresh curd for fermentation .
-
Check Oil Temperature: Oil should be medium hot. Too hot will burn jalebis, too cold will make them flat and oily .
-
Consistency of Batter: The batter should be flowing but thick enough to hold shape. Practice on a plate first if needed .
-
Syrup Consistency: One-string syrup is perfect. If syrup is too thin, jalebis become soggy. If too thick, syrup won’t soak properly .
-
Dip When Hot: Always dip jalebis in syrup when they are hot and syrup is warm. This helps them absorb the right amount of sweetness .
-
Biggest Mistake: Making syrup too thin or thick. Practice the one-string test carefully.
Variations & Substitutes to Try
-
Instant Jalebi (No Fermentation): Use self-raising flour or add ¼ teaspoon baking soda. Rest batter for 30 minutes only. Taste will be different but still good .
-
Yeast Version: Use ½ teaspoon active dry yeast instead of fermentation. Dissolve in warm water with sugar, add to batter, rest for 1 hour .
-
Jain Version: This recipe is already Jain-friendly as it has no onion-garlic. Ensure curd is Jain-approved.
-
Vegan Jalebi: Use plant-based yogurt and fry in oil instead of ghee.
-
Rabri Jalebi: Serve jalebis with thick, creamy rabri. A royal combination!
-
With Milk: Some people enjoy jalebis soaked in warm milk, especially in winter.
-
Color Variation: Use saffron for natural yellow color, or skip color completely .
Serving Suggestions: Best Ways to Enjoy
-
Hot and Fresh: Jalebis taste best when served hot and fresh, straight from the syrup .
-
With Rabri: Serve with thick, creamy rabri for special occasions. This is a classic combination.
-
With Curd: In some parts of India, jalebis are eaten with fresh curd. Try it – sweet and sour taste is amazing!
-
With Milk: Enjoy with warm or cold milk, especially as a breakfast or evening snack.
-
Festival Special: Serve during Diwali, Holi, Eid, and weddings. Jalebis are a must in celebrations .
-
Best Occasion: Perfect for festivals, parties, weekend breakfasts, and whenever you crave something sweet.
FAQs: Your Jalebi Questions Answered
Q1: Why did my jalebis become hard?
A1: This happens if batter was too thick or syrup was not correct consistency. Also, over-frying can make them hard. Fry until golden only.
Q2: My jalebis are not crispy. Why?
A2: They may not be fried enough, or oil temperature was too low. Also, if you soak in syrup for too long, they become soft .
Q3: Can I make jalebi batter without fermentation?
A3: Yes, use instant yeast or self-raising flour for quick version. But traditional fermented batter gives best taste .
Q4: How long can I store jalebis?
A4: Store in airtight container for 2-3 days. Reheat in microwave for 10-15 seconds to soften before eating.
Q5: Why did my sugar syrup crystallize?
A5: You did not add lemon juice, or you stirred the syrup too much after boiling. Lemon juice prevents crystallization .
Q6: How to get perfect spiral shape?
A6: Practice with squeeze bottle. Start from inside and go outward with steady hand. Don’t worry if first few are not perfect – practice makes perfect .
Q7: Can I use this recipe for jalebi on festivals like Diwali?
A7: Yes, this is a traditional recipe perfect for all festivals and celebrations .
Conclusion
So friends, now you know how to make perfect jalebi recipe at home. These crispy, juicy, and sweet spirals are not just a dessert – they are an emotion in Indian households. The key is patience – let the batter ferment well, make the right syrup, and practice the shape.
Once you master this, you will never buy jalebis from outside again. Your family will love you for making these at home. The smell of jalebis frying will make your house feel like a festive sweet shop.
I hope you try this recipe for the next festival or weekend. Please make it and tell me in the comments how it turned out! Share your photos and stories. For more Indian sweet recipes, check out our Besan Ke Laddoo in New Style and Navratri – Singhare Ke Pakode Recipe .
Happy cooking and happy eating!