Homemade lachha paratha recipe – I have a love-hate relationship with this bread. Love because when it is done right, it is the most beautiful, flaky, buttery thing you will ever eat. Hate because the first twenty times I tried to make it, my parathas looked like wrinkled bedsheets. No layers. Just flat, sad rotis that my family politely ate while looking at me with pity. But I am stubborn. I kept trying. I watched videos. I read blogs. I burned my fingers. And finally – finally – I cracked the code.
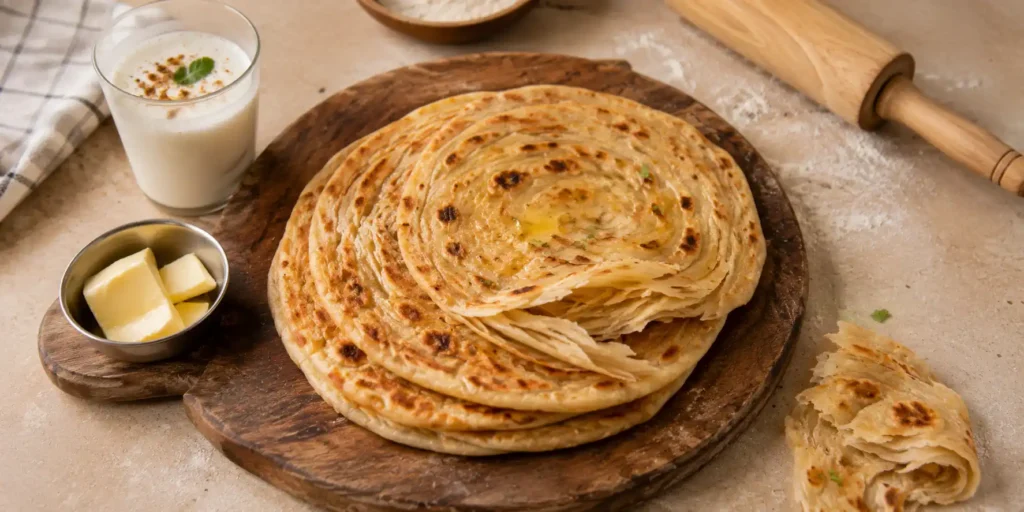
Lachha paratha is not just a roti. It is an experience. The smell of whole wheat flour being kneaded with water and a little salt, the sound of the rolling pin hitting the board, the sight of those golden-brown layers peeling apart when you break a piece. And the taste? Crispy on the outside, soft and flaky on the inside, with that unmistakable richness of ghee seeping through every layer. It is the kind of bread that makes you close your eyes and say, “Mmm.”
Homemade Lachha Paratha Recipe
For Indian homes, lachha paratha is the star of weekend dinners. It pairs with anything – dal, paneer, chicken curry, or even just a dollop of butter. It is fancy enough for guests but simple enough for a Sunday lunch. And trust me, once you learn this homemade lachha paratha recipe, you will never buy frozen parathas again.
A small tangent: The first time I successfully made a lachha paratha, I called my mother and said, “Maa, I have done it.” She said, “Beta, send a photo.” I sent it. She said, “Yeh toh dhaba jaisa hai.” I cried a little. Happy tears.
Step-by-Step Recipe Method
1st Step: Make the Dough
Take a large mixing bowl. Add the whole wheat flour and salt. Mix. Add 1 tablespoon of oil or ghee. Rub it into the flour with your fingers until it looks like breadcrumbs. Now slowly add lukewarm water, little by little, and knead. Knead for 8 to 10 minutes until you get a soft, smooth, and elastic dough. It should not be sticky. If sticky, add a little flour. If dry, add a little water.
Cover the dough with a damp cloth. Let it rest for 20 to 30 minutes. This resting period is very important – it relaxes the gluten and makes the rolling easier.
A mistake I made: I skipped the resting time. The dough kept shrinking back when I rolled it. Rest. Please rest.
2nd Step: Divide the Dough
After resting, divide the dough into equal-sized balls – about the size of a large lemon (8 to 10 balls depending on the size you want). Cover the balls with a damp cloth so they do not dry out. Work with one ball at a time.
3rd Step: Roll the First Layer
Take one dough ball. Flatten it with your palm. Dust with a little flour. Roll it into a thin round disc – about 6 to 7 inches in diameter. It should be thin but not paper-thin. You should see the counter through it slightly.
4th Step: Apply Ghee and Create the Layers
This is the heart of the lachha paratha. Take the rolled disc. Brush the entire surface with melted ghee. Be generous. Do not be shy. A thin layer will not give you flakes.
Now fold the disc like a fan (pleats) – like you are folding a paper fan. Each fold should be about 1 inch wide. Once you have a long strip, brush ghee on top of the strip again. Now roll this strip into a spiral, like a pinwheel. Tuck the end underneath. Press gently.
A mistake I made: I did not brush ghee between the pleats. The layers stuck together. No flakes. Just a thick roti. Ghee is the secret.
5th Step: Roll the Spiral
Take the spiral ball. Gently flatten it with your palm. Dust with a little flour. Roll it into a round paratha – about 6 to 7 inches in diameter. Roll evenly, but do not press too hard – you do not want to squash the layers. The layers should remain visible.
6th Step: Heat the Tawa
Place a non-stick tawa or cast iron skillet on medium-high flame. Let it heat for 1 to 2 minutes. Sprinkle a few drops of water – if they sizzle and evaporate, it is ready.
7th Step: Cook the Paratha
Place the rolled paratha on the hot tawa. Cook for 30 seconds until small bubbles appear on the surface. Flip. Brush the cooked side with ghee or oil. Flip again. Brush the other side. Press gently with a spatula so the paratha cooks evenly. Flip once or twice more until both sides are golden brown, crispy, and have beautiful dark spots.
The paratha should puff up slightly – that is the ghee creating steam between the layers.
8th Step: The Final Ghee Bath
Remove the paratha from the tawa. Immediately brush it with a generous amount of melted ghee on both sides. Clap the paratha gently between your palms – this releases the steam and separates the layers. You will see the beautiful flakes. Repeat for all parathas.
Serve immediately. Lachha paratha waits for no one.
Pro Cooking Tips
-
Mistake to avoid: Rolling the paratha too thin after creating the spiral. If you roll too thin, the layers merge and become flat. Aim for a medium thickness.
-
Ghee temperature: Use melted ghee, not solid. Solid ghee does not spread evenly and the layers stick.
-
Resting the dough: Do not skip the resting step. It makes the dough pliable and easy to roll.
-
Pleating technique: Fold the disc like a fan. If the pleats are too wide, the layers will be thick. If too narrow, they will break. Aim for 1-inch pleats.
-
Clapping technique: After cooking, clap the paratha between your palms while it is still hot. It releases steam and separates the layers. Do not skip this – this is what gives lachha paratha its signature look.
-
Leftover parathas: Store in a roti box or wrap in foil. Reheat on a tawa with a little ghee. Do not microwave – it becomes rubbery.
Variations & Substitutes
Healthy version: Use whole wheat flour. Reduce ghee by half. Use oil instead of ghee for brushing. Add flaxseed or chia seeds to the flour.
Jain version: No onion, no garlic – this recipe has none. Use only ghee made from dairy (allowed in Jain diet). Use rock salt.
Without onion-garlic: Already without.
Vegan version: Use coconut oil or vegan butter instead of ghee. Ensure the oil is plant-based.
Restaurant style (extra flaky): Add 2 tablespoons of maida (all-purpose flour) to the whole wheat flour. Use only ghee (no oil). Brush ghee generously between every layer.
Spiced version: Add crushed ajwain (carom seeds) or black pepper to the flour. Also brush with a little chaat masala before the final ghee bath.
Serving Suggestions
Serve this homemade lachha paratha recipe with:
-
Dal makhani – the creamy black dal is a classic pairing
-
Paneer butter masala – rich and creamy, perfect with flaky paratha
-
Chicken curry – the paratha soaks up all the gravy
-
Salted lassi or chaas – the cool drink balances the richness
-
Pickle and sliced onions – the perfect crunchy side
Best time to enjoy? Sunday lunch with family, dinner parties, or anytime you want to feel like you are eating at a five-star dhaba. Also perfect for when you want to impress guests without making a complicated main dish.
For another Indian bread classic, check out my Suji Toast on Luckky Corner – it is smoky and charred. And if you want a side dish that pairs perfectly with lachha paratha, try my Dhaba Style Dal Fry Recipe – the combination is legendary.
FAQs
What is the difference between lachha paratha and normal paratha?
Lachha paratha has distinct, visible layers (lachha means “layered” in Hindi). Normal paratha is usually a single flatbread with fewer layers. Lachha paratha is made by pleating the dough and rolling it into a spiral, creating multiple thin layers.
Why is my lachha paratha not flaky?
Either you did not use enough ghee between the layers, or you rolled the paratha too thin after making the spiral. The ghee creates steam that separates the layers. Be generous with ghee and roll gently.
Can I make lachha paratha without a rolling pin?
You can use your hands to flatten the spiral ball, but a rolling pin gives you an even, uniform thickness. If you do not have one, press gently with your palms.
How do I store leftover lachha paratha?
Store in an airtight container at room temperature for up to 2 days. Reheat on a tawa with a little ghee. Do not refrigerate – it becomes hard. If you must freeze, separate each paratha with parchment paper, freeze, and reheat directly on a tawa.
Can I use maida instead of wheat flour?
Yes. Maida (all-purpose flour) gives a softer, more restaurant-style texture. The layers will be even more delicate. Use the same method.
Is lachha paratha healthy?
It is indulgent because of the ghee. But whole wheat flour provides fibre, and ghee has healthy fats. Enjoy it occasionally as a treat, not every day.
Conclusion
This homemade lachha paratha recipe turned my kitchen into a paratha paradise. The layers, the flakiness, the golden-brown colour – it is pure magic. Yes, it takes a little practice. Yes, you might burn your fingers. Yes, the first few might look like wrinkled blankets. But keep going. The moment you see those beautiful layers separate, you will feel like a chef. And the taste? Worth every effort.
Make it this weekend. Brush it with ghee. Clap it. Watch the layers fall apart. Then come back here and tell me – did your layers appear? Did you burn your fingers? Did you eat three like I did? I want to hear all your paratha stories. And remember – more ghee equals more love.