
Crispy masala dosa batter recipe – I have a confession. For three years, I could not make a decent dosa. My batter was either too thick, too thin, not fermented enough, or so fermented that it smelled like a science experiment gone wrong. My dosas stuck to the pan. They broke when I tried to flip them. They were pale, sad, and definitely not crispy. My South Indian friend would come over and just sigh. She said, “Beta, dosa kaise bana rahe ho?” I had no answer.
Then one day, I decided to stop failing. I called my grandmother. She gave me three rules: soak properly, grind smooth, ferment with patience. I followed those rules. And on the fourth attempt, the first dosa came out golden, lacy, and so crispy that it made a crunch sound when I folded it. I almost cried. I called my grandmother. She said, “Beta, ab samajh aaya na?” Yes, Maa. Yes.
Crispy Masala Dosa Batter Recipe
So here it is. My crispy masala dosa batter recipe. No shortcuts. No baking soda. Just the right proportions, a little patience, and a lot of love. You will get restaurant-style crispy dosas at home. I promise.
A small tangent: My daughter now refuses to eat dosa from any restaurant. She says, “Papa ka dosa is better.” That is the highest compliment. Also, she now calls me “Dosa Master.” I have a new title.

Step-by-Step Recipe Method
1st Step: Soak the Rice and Dal
Wash the rice and urad dal separately in cold water until the water runs clear. In a large bowl, combine the rice, urad dal, and fenugreek seeds. Add enough water to cover them completely – about 2 to 3 inches above. Soak for 4 to 6 hours (or overnight). The dal should double in size and become soft when pressed.
A mistake I made: I did not soak the dal long enough. The batter was gritty. Soak overnight for best results.
2nd Step: Grind to a Smooth Batter
Drain the soaked ingredients. Do not throw away the soaking water – use it for grinding. In a wet grinder or a powerful mixer, first grind the urad dal and fenugreek seeds with very little water until it becomes light, fluffy, and almost creamy (about 10 minutes). The batter should double in volume. Transfer to a large bowl.
Now grind the rice with water until smooth. The rice batter should have a fine, slightly grainy texture – not paste-like. Add the rice batter to the urad batter. Mix well with your hands (yes, hands – they help aerate the batter). Add salt. The consistency should be like thick pancake batter – pourable but not runny.
3rd Step: Ferment the Batter (The Most Important Step)
Cover the bowl with a lid or a plate. Place it in a warm spot in your kitchen – near the gas stove, inside an oven (turned off), or on a windowsill in the sun. Let it ferment for 8 to 12 hours (or overnight). In warm weather, it takes less time. In cold weather, it takes longer.
The batter is ready when you see bubbles on the surface, and it smells slightly sour and fermented. It should have doubled in volume. Do not over-ferment – the batter will become too sour and dosas will be sticky.
4th Step: Stir and Adjust Consistency
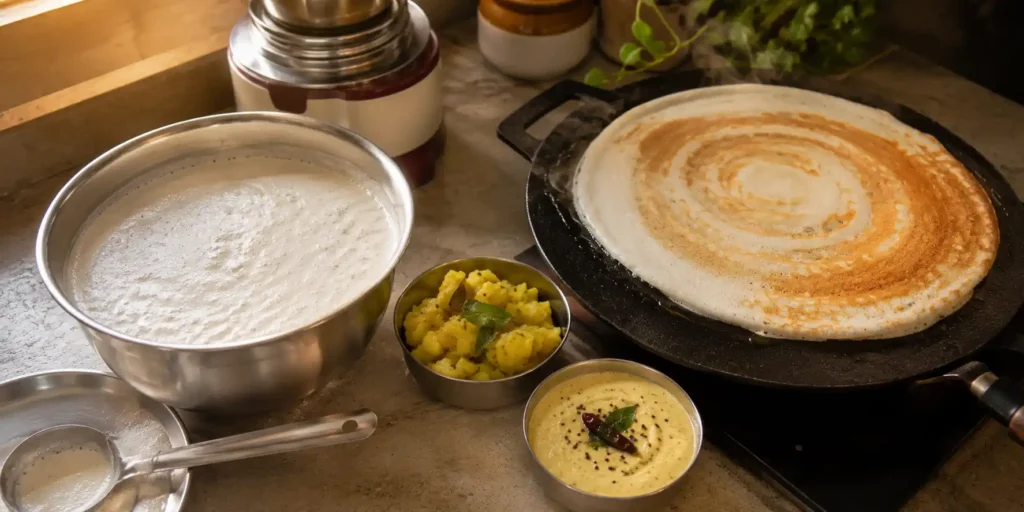
Gently stir the fermented batter with a ladle. It will deflate slightly – that is normal. Add water little by little to adjust the consistency. The batter should be thin enough to spread easily on the tawa but thick enough to coat the back of a spoon. It should be like a pouring custard.
5th Step: Prepare the Potato Masala (While Batter Rests)
Heat 2 tablespoons of oil in a pan. Add mustard seeds and cumin seeds. Let them crackle. Add asafoetida, curry leaves, and sliced onions. Sauté until onions are soft and golden. Add green chillies and turmeric powder. Cook for 1 minute. Add the mashed potatoes. Stir well. Add salt and a little water (about ¼ cup). Cook for 2 to 3 minutes. Mash everything together. Add coriander and a squeeze of lemon. The masala should be soft and slightly moist. Keep warm.
6th Step: Heat the Tawa
Place a non-stick tawa or cast iron skillet on medium-high flame. Let it heat for 2 to 3 minutes. Sprinkle a few drops of water – if they sizzle and evaporate instantly, it is ready. Wipe the tawa with an oil-soaked cloth or onion half (this prevents sticking).
7th Step: Spread the Dosa
Take a ladleful of batter (about ¾ cup). Pour it in the centre of the tawa. Using the back of the ladle, spread it in a circular motion from the centre outwards, creating a thin, even layer. Do not press too hard – let the batter flow. The thinner the dosa, the crispier it will be.
Drizzle a little oil or ghee around the edges. Let it cook on medium-high flame. You will see bubbles forming. The edges will start lifting and turning golden brown.
8th Step: Add Masala and Fold
Place a generous spoonful of the potato masala in the centre of the dosa. Fold the dosa into a half-moon or a roll (like a cylinder). Remove from the tawa. Serve immediately with coconut chutney and sambar.
Repeat for all dosas. The batter makes about 10 to 12 dosas.
Pro Cooking Tips
-
Mistake to avoid: Adding water too early to the fermented batter. Always stir the batter first, then add water slowly. Adding water before stirring dilutes the fermentation.
-
Crispiness hack: Add a tablespoon of rice flour or semolina (rava) to the batter just before making dosas. It adds extra crunch.
-
Tawa temperature: The tawa must be hot enough for the batter to spread. If it is too cold, the dosa will not cook properly. If too hot, it will burn. Medium-high is the sweet spot.
-
Oil trick: After spreading the dosa, drizzle oil only around the edges, not in the centre. This makes the edges crispy while the centre remains soft.
-
Fermentation in winter: If it is cold, place the batter bowl inside the oven with only the light on. Or wrap it with a blanket. The warmth helps fermentation.
-
Leftover batter: Store in the fridge for up to 3 days. The batter will continue to ferment slowly. Stir well before using.
Variations & Substitutes
Healthy version: Use brown rice instead of white rice. Add ¼ cup oats flour for extra fibre. Use less oil while making dosas.
Jain version: No onion, no garlic – this recipe has none. Skip green chillies if you want. Use rock salt. No potato (some Jains avoid root vegetables) – use mashed raw banana or pumpkin instead.
Without onion-garlic: Already without.
Vegan version: Already vegan. Use oil instead of ghee.
Extra crispy version: Add 2 tablespoons of soaked poha (flattened rice) while grinding. Also add a tablespoon of sugar – it helps with browning and crispiness.
Onion dosa version: Sprinkle finely chopped onions, green chillies, and coriander on the dosa before it sets. Flip and cook for 30 seconds. Delicious.
Serving Suggestions
Serve these crispy dosas with:
-
Coconut chutney – white, smooth, with a hint of ginger and green chilli
-
Sambar – the classic South Indian lentil soup
-
Podicha chutney – dry chutney powder mixed with oil
-
Fresh filter coffee – the perfect ending
Best time to enjoy? Breakfast, brunch, or a lazy weekend dinner. Also perfect for Sunday mornings when you have time to ferment and cook.
For another South Indian classic, check out my Authentic South Indian Sambar Recipe on Luckky Corner – it is the perfect companion for dosa. And if you want a North Indian bread, try my Homemade Lachha Paratha Recipe – flaky and buttery.
FAQs
Why is my dosa not crispy?
The batter might be too thick, or the tawa was not hot enough. Also, adding too much water makes dosas soft. Use a thin batter and a hot tawa. Drizzle oil around the edges.
How do I get holes in my dosa?
Holes come from well-fermented batter. The bubbles in the batter create the lacy holes when the dosa cooks. So proper fermentation is key.
Can I use a mixer grinder instead of a wet grinder?
Yes, but the batter will be slightly less fluffy. Grind the urad dal first to a smooth paste, then the rice separately. Add water sparingly. It works.
How long does dosa batter last in the fridge?
Up to 3 days. The batter will sour slightly over time – that is normal. Stir well before using. If it becomes too sour, add a pinch of sugar to balance.
Why is my dosa sticking to the pan?
Either the pan was not hot enough, or it was not seasoned properly. Heat the tawa, wipe with oil, and pour the batter. Also, do not flip too early – wait for the edges to lift.
Can I make dosa without fermentation?
You can make “instant dosa” with vinegar or baking soda, but it will not be crispy or taste authentic. Fermentation is the soul of a good dosa. Do not skip it.
Conclusion
This crispy masala dosa batter recipe turned my kitchen into a dosa paradise. The golden, lacy dosas, the soft potato masala, the fresh coconut chutney – it is a meal that makes you feel like you are sitting in a South Indian café. Yes, it takes time. Yes, you have to plan ahead. But the result is worth every minute.
Make it this weekend. Ferment the batter. Heat the tawa. Spread that perfect circle. Fold it with potato masala. Then take a bite and listen to that crunch. Then come back here and tell me – did your dosa get crispy? Did you add the fenugreek seeds? Did you burn the first dosa like I always do? I want to hear everything.