
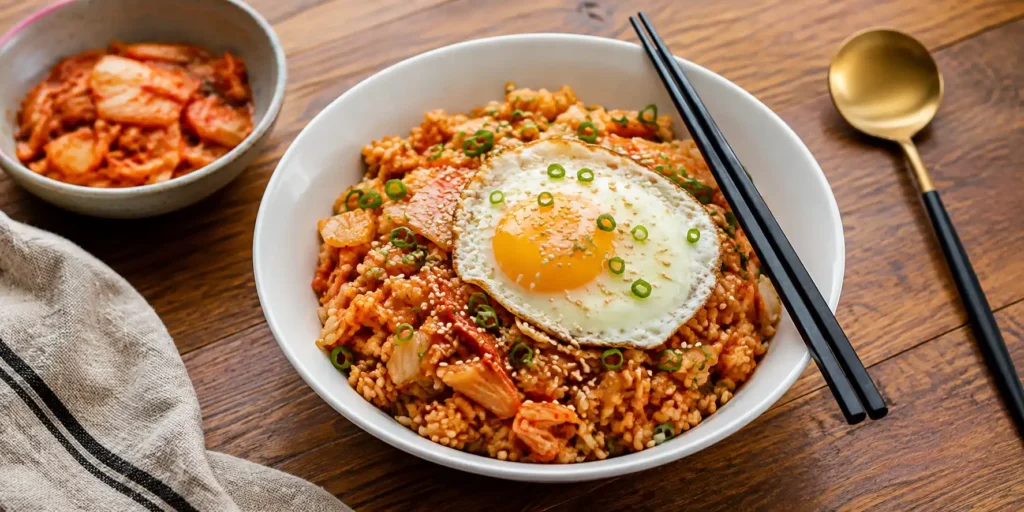
Basic kimchi fried rice – yaar, you know that feeling when you open your fridge and see a jar of kimchi that has been sitting there for a while, getting all sour and funky? Most people throw it away. But Koreans? They turn it into something magical. Kimchi fried rice – or kimchi bokkeumbap – is the ultimate comfort food. It is tangy, spicy, savoury, and so satisfying. And the best part? It takes 15 minutes. No complicated steps. No fancy ingredients. Just rice, kimchi, and a few basic things from your kitchen.
I discovered kimchi fried rice during a late-night K-drama binge. The character was having a bad day. She opened her fridge, grabbed some kimchi, and made this beautiful, red-tinted fried rice in minutes. She topped it with a fried egg. The yolk broke and mixed into the rice. I was hungry. I had to make it.
Korean Kimchi Fried Rice
So here it is. My basic kimchi fried rice recipe. Simple. Quick. Packed with flavour. And perfect for those days when you want something comforting without spending hours in the kitchen.
A small tangent: My daughter once asked, “Papa, why is the rice red?” I said, “Because kimchi is spicy.” She said, “Is it like Indian red rice?” I said, “Different. But just as delicious.” She ate two bowls.

Step-by-Step Recipe Method
1st Step: Prep the Kimchi
Take 1 cup of kimchi. Chop it into small, bite-sized pieces. Do not chop too fine – you want to taste the kimchi in every bite. Reserve 2 tablespoons of the liquid (kimchi juice) from the jar. This juice is pure flavour.
A mistake I made: I used fresh, mild kimchi. The fried rice was bland. For the best flavour, use older, well-fermented kimchi. It is tangier and has more depth.
2nd Step: Mix the Sauce
In a small bowl, combine gochujang, soy sauce, sesame oil, sugar, and the reserved kimchi juice. Whisk until smooth. This sauce is the heart of the dish.
3rd Step: Sauté the Aromatics
Heat 2 tablespoons of oil in a large wok or non-stick pan over medium-high heat. Add the chopped onion. Sauté until soft and translucent – about 2 minutes. Add the minced garlic and the white parts of spring onions. Cook for 30 seconds until fragrant.
4th Step: Fry the Kimchi
Add the chopped kimchi to the pan. Stir-fry for 2 to 3 minutes until the kimchi softens and becomes fragrant. The colour will deepen, and the smell will be tangy and spicy.
5th Step: Add the Rice
Add the cold, cooked rice to the pan. Break up any clumps with your spatula. Do not stir constantly – let the rice sit for 30 seconds to get crispy bits on the bottom.
6th Step: Add the Sauce
Pour the prepared sauce over the rice. Stir-fry everything together for 2 to 3 minutes until the rice is evenly coated and the colour is a beautiful reddish-orange. Taste and adjust salt or spice.
7th Step: Fry the Egg
While the rice is cooking, heat a small pan with a little oil. Crack the egg into the pan. Fry on medium-low heat without flipping – the yolk should be runny. Season with a pinch of salt and pepper.
8th Step: Serve and Enjoy
Transfer the kimchi fried rice to a bowl. Place the fried egg on top. Garnish with sesame seeds, chopped spring onions, and crumbled seaweed if you have it. Break the yolk and mix it into the rice. Slurp loudly. Feel the comfort.
Pro Cooking Tips
-
Mistake to avoid: Using freshly cooked rice. Fresh rice is too soft and sticky. Always use day-old, cold rice for the best texture.
-
Kimchi quality: Older, well-fermented kimchi gives the best flavour. If your kimchi is young and mild, add a splash of vinegar to boost the tanginess.
-
Crispy bits: Let the rice sit untouched for 30 seconds after adding it to the pan. This creates those delicious crispy bits on the bottom.
-
Butter hack: Add a spoonful of butter at the end for extra richness. It gives the fried rice a glossy finish.
-
Runny egg: A fried egg with a runny yolk is essential. The yolk mixes with the rice and adds creaminess.
-
Make it a meal: Add diced spam, bacon, or tofu for extra protein. Or keep it simple – the kimchi is the star.
Variations & Substitutes
Healthy version: Use brown rice. Reduce oil. Add extra vegetables like carrots or bell peppers. Skip the egg or use egg whites.
Jain version: No onion, no garlic – skip them. Add hing (asafoetida) for flavour. Use only kimchi (check that it has no onion or garlic – some brands add them). Use rock salt.
Without onion-garlic: Skip onion and garlic. Add hing and extra ginger. The flavour will be milder but still good.
Vegan version: Skip the egg. Use tofu instead. Ensure kimchi is vegan (some brands add fish sauce or shrimp paste – check the label).
Extra protein version: Add ½ cup diced tofu, paneer, or boiled chickpeas along with the kimchi.
Cheese kimchi fried rice: Sprinkle shredded mozzarella on top and melt it under a grill. Gooey and delicious.
Serving Suggestions
Serve this basic kimchi fried rice with:
-
A fried egg on top (non-negotiable for the full experience)
-
A side of kimchi (more kimchi, why not?)
-
A bowl of clear soup (like miso or vegetable broth)
-
Pickled radish (danmuji) – cuts through the richness
Best time to enjoy? Any time. Late-night cravings. Lazy weekends. Busy weeknights. When you need comfort. When you have leftover rice. Always.
If you love Korean food, check out my Vegetarian Jajangmyeon recipe on Luckky Corner – black bean noodles that are pure comfort. And for a crispy snack, try my Korean Fried Cauliflower – it is perfect with rice.
FAQs
What is basic kimchi fried rice?
It is a simple Korean dish made with kimchi, rice, and a few seasonings. It is tangy, spicy, savoury, and often topped with a fried egg. It is the ultimate comfort food.
Can I make kimchi fried rice without gochujang?
Yes. You can use red chilli powder mixed with a little sugar and water. The flavour will be slightly different, but it will still be delicious.
Why is my kimchi fried rice not red?
You either used too little gochujang or did not add enough kimchi juice. Add more of both for that signature red colour.
Can I use fresh rice instead of day-old rice?
Fresh rice is too soft and sticky. For the best texture, use day-old rice that has been refrigerated. If you have to use fresh rice, spread it on a plate and let it cool completely before frying.
Is kimchi fried rice healthy?
Kimchi is fermented and rich in probiotics. It is low in calories and high in fibre. The rice provides energy. Adding vegetables and protein makes it a balanced meal.
How do I store leftover kimchi fried rice?
Store in an airtight container in the fridge for up to 3 days. Reheat in a pan with a splash of water – do not microwave, as it makes the rice dry.
Conclusion
This basic kimchi fried rice recipe is my weeknight hero. It is quick, comforting, and so forgiving – even if you make a mistake, it still tastes good. The tangy kimchi, the spicy gochujang, the runny egg yolk – it all comes together like a warm hug. My family now asks for this every week. My daughter loves the “red rice.” My wife says it is better than takeout.
Make it tonight. Use that leftover rice. Open that jar of kimchi. Fry an egg. Then take a bite and close your eyes. You will feel like you are in Seoul. Then come back here and tell me – did your egg stay runny? Did you add extra kimchi? Did you eat it straight from the pan like I do? I am waiting.