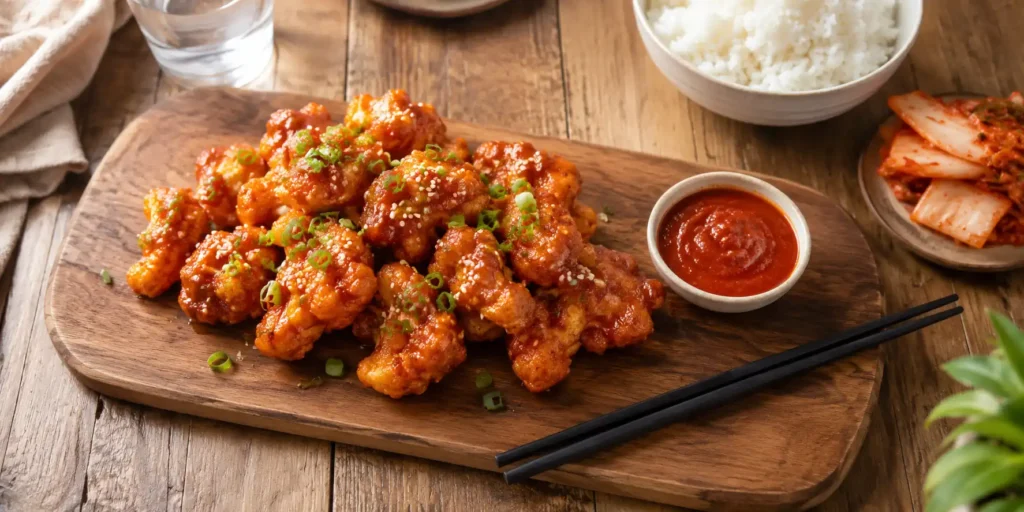
Korean fried cauliflower – I never thought cauliflower could be this exciting. You know how cauliflower usually is? Boring. White. Smells like… cauliflower. But then I had this dish at a Korean fusion place in Mumbai. The waiter brought out a plate of golden, crispy florets coated in a sticky, red-orange sauce that glistened under the lights. I took a bite. CRUNCH. Then sweetness. Then heat. Then a little tang. I closed my eyes. My friend asked if I was okay. I said, “I am seeing colours.”
That is the magic of Korean fried cauliflower. It is like cauliflower decided to dress up and go to a party. The outside is shatteringly crispy. The inside is soft and tender. And the sauce? It is sweet, spicy, savoury, and sticky – the kind of sauce that makes you lick your fingers and not care who is watching.
Korean Fried Cauliflower
For Indian homes, this is a game-changer. We love gobi manchurian, right? This is like gobi manchurian’s Korean cousin who went to Seoul and came back with attitude. It is vegan, it is addictive, and it is perfect for when you want something crispy and saucy without meat.
A small tangent: The first time I made this, my batter was too thin. The cauliflower came out looking like sad, naked florets with a few crispy bits hanging on. I ate them anyway. They tasted okay but looked like a crime scene. So learn from my mistakes. Follow the steps. Especially the double-coating part.

Step-by-Step Recipe Method
1st Step: Prepare the Cauliflower
Wash the cauliflower thoroughly. Cut it into bite-sized florets – not too big (they won’t cook properly) and not too small (they will burn). Bring 4 cups of water to a boil in a large pot. Add 1 teaspoon salt. Add the cauliflower florets. Blanch for exactly 2 minutes. Do not overcook – they should still be slightly firm. Drain immediately and rinse with cold water to stop cooking. Pat the florets completely dry with a kitchen towel. Any moisture will make the batter slide off.
A mistake I made: I skipped blanching. The cauliflower was raw inside when fried. Blanching ensures the inside cooks without burning the outside.
2nd Step: Make the Batter
In a large mixing bowl, whisk together all-purpose flour, cornflour, garlic powder, ginger powder, black pepper, and salt. Add cold water gradually while whisking. The batter should be thick enough to coat the back of a spoon – like a pancake batter, not runny. Add the 1 tablespoon oil and whisk again. Oil makes the coating extra crispy.
If the batter is too thick, add a teaspoon of water. If too thin, add a teaspoon of cornflour.
3rd Step: Coat the Cauliflower
Add the dry cauliflower florets to the batter. Use your hands (or a spoon) to coat each piece evenly. Make sure every nook and cranny has batter. Let the coated florets sit for 5 minutes. This helps the batter stick better.
4th Step: Double Coat for Extra Crunch (Optional but Recommended)
If you want that ultra-crispy Korean fried chicken texture, double coat. After the first coat, roll the battered florets in dry cornflour or panko breadcrumbs. Shake off excess. This creates a super crunchy shell. I do this when I want to impress guests. When it is just me, single coat is fine.
5th Step: Heat the Oil for Frying
Take a deep kadhai or pot. Add enough oil to submerge the florets – about 2 inches. Heat the oil on medium flame. To test if the oil is ready, drop a small piece of batter into the oil. It should sizzle and rise to the surface within 5 seconds. Not faster (oil too hot) and not slower (oil too cold).
6th Step: Fry the Cauliflower
Carefully drop the coated florets into the hot oil, one by one. Do not overcrowd – fry in batches. Fry for 3 to 4 minutes, turning occasionally, until the florets are deep golden brown and crispy. Remove with a slotted spoon and drain on a paper towel. Repeat with all florets.
For extra crispiness, double fry: fry once for 3 minutes, remove, let rest for 5 minutes, then fry again for 1 minute. This is the Korean fried chicken secret.
7th Step: Make the Sticky Sauce
In a separate pan, combine gochujang, soy sauce, maple syrup, rice vinegar, sesame oil, minced garlic, grated ginger, and ¼ cup water. Whisk everything together. Bring to a simmer on medium flame. Let it bubble for 2 minutes. Add the cornflour slurry (1 teaspoon cornflour mixed with 2 tablespoons water). Stir continuously. The sauce will thicken in 30 seconds into a glossy, sticky glaze. Turn off the flame.
Taste the sauce. It should be sweet, spicy, tangy, and savoury. Adjust sweetness or spice to your liking.
8th Step: Toss and Serve
Add the fried cauliflower florets to the pan with the sauce. Toss gently until every piece is coated in that beautiful red-orange glaze. Do not cook for more than 30 seconds – the cauliflower will lose its crunch. Transfer to a serving plate. Sprinkle with roasted sesame seeds and chopped spring onions. Serve immediately.
Pro Cooking Tips
-
Mistake to avoid: Adding the sauce to the pan and then cooking the cauliflower in it for too long. The sauce makes the coating soggy. Toss and serve right away.
-
Cold water trick: Always use ice-cold water for the batter. Cold batter + hot oil = extra crispy coating. I keep a bottle of water in the fridge just for this.
-
Double fry method: If you have time, double fry. It makes a huge difference. The cauliflower stays crispy even after adding the sauce.
-
Sauce consistency: The sauce should be thick and sticky, not watery. If it is too thin, add more cornflour slurry. If too thick, add a splash of water.
-
Make ahead: You can fry the cauliflower (without sauce) and keep it in the fridge for a day. Reheat in an air fryer or oven at 180°C for 5 minutes, then toss with fresh sauce.
-
Leftover sauce: Extra sauce is amazing on rice, noodles, or even as a dip for spring rolls. Store in the fridge for a week.
Variations & Substitutes
Healthy version (air fryer): Instead of deep frying, air fry the battered florets at 180°C for 12 to 15 minutes, shaking halfway. Spray with oil. Then toss in sauce. Less oil, still crispy.
Jain version: No onion, no garlic. Skip garlic and ginger. Use hing (asafoetida) in the sauce. No potatoes or root vegetables – cauliflower is fine. Use rock salt.
Without onion-garlic: Skip garlic and ginger. Add a pinch of hing and extra gochujang for flavour. Works well.
Vegan version: Already vegan if you use maple syrup instead of honey. Most gochujang is vegan (check label – some contain honey).
Extra spicy version: Add 1 teaspoon gochugaru (Korean red pepper flakes) to the sauce. Also add a chopped fresh red chilli while making the sauce.
Serving Suggestions
Serve this Korean fried cauliflower as an appetizer, a main course with rice, or a party snack. Pair it with steamed white rice and kimchi for a complete Korean meal. Also amazing with veg jajangmyeon or Korean ramen. A side of pickled radish (danmuji) cuts through the richness perfectly.
Best time to enjoy? Game nights, movie marathons, or whenever you crave something crispy and saucy. Also great for impressing guests who think cauliflower is boring.
If you love Korean-inspired dishes, check out my Veg Jajangmyeon recipe on Luckky Corner – it is another Korean-Chinese classic. And for a saucy Indo-Chinese favourite, try my Soya Chunk Chilli Dry – similar vibe, different protein.
FAQs
What is Korean fried cauliflower made of?
It is cauliflower florets coated in a crispy batter, deep-fried, and tossed in a sticky, sweet-spicy sauce made with gochujang (Korean red chili paste), soy sauce, garlic, ginger, and sugar/syrup.
Is Korean fried cauliflower healthy?
Deep-fried, so not the healthiest. But cauliflower itself is nutritious. For a healthier version, air fry or bake instead of deep frying. The sauce has no artificial preservatives.
Can I make this without gochujang?
Gochujang is the key flavour. Without it, it is just sweet-spicy cauliflower – still tasty but not Korean. You can substitute with a mix of red chilli powder, miso paste, and sugar, but it won’t be the same.
Why is my cauliflower not crispy?
Possible reasons: batter too thin, oil not hot enough, overcrowded pan, or you added sauce too early. Use cold batter, test oil temperature, fry in batches, and toss in sauce only at the end.
Can I bake Korean fried cauliflower instead of frying?
Yes. Bake at 200°C for 20 to 25 minutes, flipping halfway. Spray with oil. The texture will be less crunchy but still good. Air frying is better.
How do I store leftovers?
Store coated and fried cauliflower (without sauce) in an airtight container in the fridge for 2 days. Reheat in an air fryer or oven, then toss with fresh sauce. Do not store sauced cauliflower – it becomes soggy.
Conclusion
This Korean fried cauliflower recipe turned me from a cauliflower sceptic into a cauliflower evangelist. The crispy shell, the tender inside, and that sticky, sweet-spicy glaze – it is pure magic. Yes, you have to deep fry. Yes, it is a little messy. But the first bite makes it all worth it.
Make it for your next party. Watch people grab piece after piece. Watch them ask, “Wait, this is cauliflower?” Then watch them reach for more. Then come back here and tell me – did you double fry? Did you add extra gochujang? Did you eat it straight from the pan like I did? I am waiting for your stories.